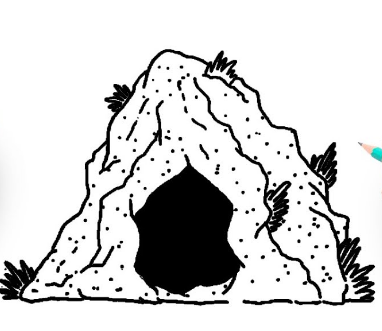
How to draw a cave step by step.
Drawing a cave is easy with this video and step-by-step drawing instructions.
Also read animal cartoon drawing
Step 1
In the first part of the tutorial on drawing a cave, we will draw some rocks and boulders that form part of one side of the cave. First, we will make a base on which the cave will rest by making a slightly wavy horizontal line. We will then use some circles to form large stacked rock shapes on the left side of this line. Once you have our reference picture, you are ready to move on to
Step 2: Next, pull some more cave mouths.
With the footsteps, we can now begin to draw the mouth of the cave. We will draw some more wavy and messy lines from the rock shapes that you just drew in the first step. You can then add some more circular shapes towards the mouth of the cave. We will continue to push in the next few steps, so let’s move on.
Step 3: Now drag the top of the cave.
We will do it the same way you started pulling the mouth of the cave in the last stage, but with some differences. While the width of the mouth on the left is quite thin, it will be a little thicker at the top. Otherwise, you will use some more messy lines for the pit.
Step 4: Next, drag to the right side of the cave.
We will continue the trend towards the top of the as it will be quite thick on the right-hand side. You will again use the same messy lines for this section. Then, once you draw this side of the cave, we can finalize the details in the next section.
Step 5: Now, you can complete the final details of your cave drawing.
In this fifth step of the tutorial on how to draw we will complete the final details and elements. However, before we do that, let’s first summarize the details. First of all, we will continue to make the outside face of the cave beautiful and stone by adding some lines from the inside of the outline of the cave. Then we will draw some more curves in the cave hole to suggest that there is some depth in it. You can then draw some horizontal, striped lines near the top of make it look like treetops in the background. Finally, we will draw some lines and rocks on the ground in front of the cave. It should cover the details in this tutorial, but you don’t have to stop there! There are many cool things you can do to help personalize your drawing. One of the fun ways to do this is to point out what you think is in we mentioned earlier, it could be a bear or a wild animal, but you could also pull a scary troll or maybe a caveman! What interesting ideas can you think of to add to the picture?
Step 6: Finish your cave drawing with some color.
This is the part where you can get creative with it and see what you can get. We’ve shown you a method you can use in our reference image. We used a nice wide color palette with blues for the sky, green for the trees, brown for the caves, and some dark yellow for the earth. You can also choose these shades, but don’t be afraid to change them and use your favorite color! You can also experiment with some cool art media, and you have lots of color options and art tools that you can use. I’m sure you’ll have fun and be creative with it, and we can’t wait to see how colorful you are in this picture! Your cave drawing is complete! Now you have completed this tutorial on how to draw a cave! We hope that this tutorial has shown you that this kind of drawing can be made much easier and more enjoyable by dividing it into stages.
Also read Wolverine’s Son Could Bring Down the X-Men – MashRadar